Showing posts with label Comfort foods. Show all posts

Saturday, January 24, 2026

Grandma’s Banana Walnut Nut Loaf Bread


Food History

Banana bread recipes like this one became popular in American kitchens during the 1930s, around the time baking soda and baking powder became common household staples. As bananas became more widely available, their use in baking soared, particularly in moist, sweet breads like this Banana Walnut Loaf. The addition of walnuts, a nut native to California and heavily promoted by Diamond, adds a satisfying crunch and depth of flavor. This recipe reflects the tradition of using locally-sourced, high-quality ingredients to enhance everyday baking.

Timeline

1920s: Diamond Walnuts becomes a household name, known for its high-quality California walnuts.

1930s: Banana bread recipes gain popularity during the Great Depression as a way to use overripe bananas.

1980s: Banana Walnut Loaf remains a beloved recipe, often shared on packaging by brands like Diamond to promote their products.

Today: This loaf continues to be a favorite, blending the rich flavor of bananas with the satisfying crunch of walnuts.

Recipe Discussion

Banana Walnut Nut Loaf Bread

This Banana Walnut Loaf is a straightforward recipe that yields a moist, flavorful bread perfect for any time of day. The combination of mashed bananas and chopped walnuts creates a deliciously dense texture, with the walnuts adding a crunchy contrast to the soft crumb. The recipe is easy to follow, making it a great option for both novice bakers and experienced cooks looking for a quick and reliable loaf to bake.

Preparation Tips

Banana Ripeness: Use very ripe bananas for the best flavor and texture. The riper the bananas, the sweeter and moister your loaf will be.

Mixing: Beat the sugar, shortening, and eggs until light and fluffy. This helps incorporate air, resulting in a lighter loaf.

Baking: Be sure to check the loaf with a toothpick around the 60-minute mark. If it comes out clean, the bread is ready.

Cooling: Allow the loaf to cool in the pan for 10 minutes before transferring it to a wire rack. This helps prevent the loaf from breaking apart.

Mark your calendars for February 23rd—National Banana Bread Day is ripe and ready! Indulge in this timeless favorite that’s always a-peeling!

 https://www.browneyedbaker.com/banana-nut-bread/

https://vintagerecipeproject.com/banana-walnut-loaf-recipe/


Saturday, November 29, 2025

Thanksgiving Dinner 2025 Making Family Traditions

 This Thanksgiving was a true blessing, especially in a time of turbulence. Across the United States, citizens were impacted by the government using the poor and underprivileged as pawns on a chessboard. However, the American people found ways to support the poor by donating to food lockers and other points of distribution. I'd like to thank Mather Market Basket for their generous donation of a Thanksgiving turkey and a top box of fresh produce. Now I belong to this community for older adults.


I had a pre-Thanksgiving dinner at my son's home, Herbert E. Raney Jr's, down in Mascoutah, Illinois. He made his famous soul food,  good luck greens, and a glazed ham with sweet corn bread. So delicious. I even froze my greens enough so that I can have them for Sunday Dinner during December. Oh my goodness, even the Pot Liquor (Likker) you can make into a Soup. 

"This is as Southern as it gets.  Take your time, and try not to take shortcuts; do not go for the quicker route by using canned products and prepackaged greens. You have to go through the ritual of picking and washing your greens, boiling the hamhock until it falls off the bone, and you have to seriously make the pot likker, using bacon grease, and other vegetables (onions, garlic, red bell peppers).  Serve with nice, thick slices of cornbread.

Ingredients

(16 ounce) package fresh collard greens, mustard, turnip greens chopped, lbs ham steaks, chopped, tablespoons hot sauce, tablespoons bacon grease, medium onions, chopped, garlic cloves, minced, celery, red pepper, (14 1/2 ounce) cans chicken broth (you can use your own stock if you'd like), cups water, tablespoon white vinegar, teaspoon salt. The trick is to let the greens simmer until tender but not overcooked.  For non-pork eaters, you can put your smoked turkey, olive oil, and season to taste with veggies and broth.

Brown Sugar Honey Glazed Baked Ham

Glazed ham is one of the easiest holiday main dishes to make. You’re starting with a baked or smoked ham, which is already cooked, so the hard work is done. And the ham glaze couldn’t be simpler or any more delicious. For this recipe, you’ll gently warm the ham in the oven, then crank up the heat and brush on the glaze so it turns sticky, shiny, and caramelized. It’s an easy process, and your guests will be so impressed.  Make the glaze: While the ham bakes, combine ¼ cup of apple juice with the brown sugar, honey, Dijon mustard, Worcestershire sauce, vinegar, pepper, and allspice in a small saucepan. Bring to a simmer over medium heat and cook until syrupy, 5 to 8 minutes. As it simmers, stay close and lower the heat if the mixture begins to bubble up to close to the top of the saucepan.

Glaze the ham: When the ham reaches 115°F (46°C), increase the oven temperature to 375°F (190°C). Brush the ham generously with glaze and roast, uncovered, for 40 minutes, brushing with more glaze every 10 minutes.


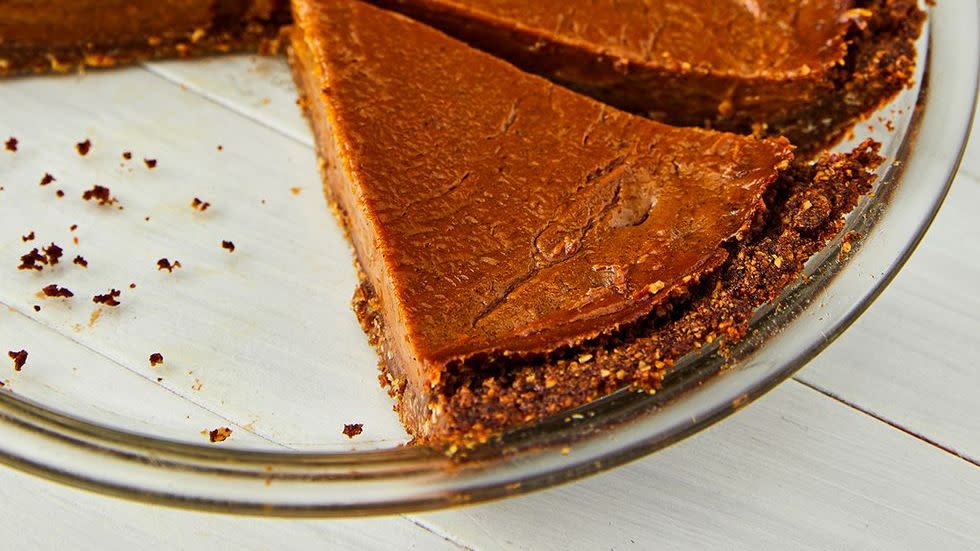
This year, I added pecan slices on top of this sweet potato pie. Some of the potatoes were donated, and I added another bag of sweet potatoes, so I was able to make four pies.  I use the recipe from Iron Pots, and Wooden Spoons by Jessica Harris. A tried and true recipe, more buttery than too sweet. Whether you serve this traditional sweet potato pie as part of your holiday dessert spread or as one of your side dishes at a true Southern feast, it's sure to have you and your guests coming back for more. My Southern sweet potato pie recipe features a silky-smooth and creamy texture thanks to evaporated milk, Borden's condensed sweet milk, and a stick of butter, perfectly balancing out the subtle spice of ground nutmeg and pure vanilla extract.  I bake my sweet potatoes instead of boiling them, adding eggs, brown sugar creamed, and folding them into the potato mixture.  I also bake the pie shells, and then add the filling and back in the oven at 325 degrees.  I also like to roll out and add crust decor to the edges so that the pie shell doesn't burn. 


Pg 169 for the best Sweet Potato Pie Recipe.


My appetizers were pickled deviled eggs made with fresh, farmed eggs from a small farmer in Mascuthah. I used regular mayonnaise and hot mayonnaise for color, sprinkled cayenne pepper on top, and finished with green and black olives.

Vegetable Tray with assorted green and black olives. 

Growing up, my mother always set out a tray for us to snack on while she was making the Thanksgiving dinner, of black olives, green olives, and pickles. We grew up in  West Fresno, California, on Lemon Avenue.  My parents bought the house from an Armenian family, Fresno, where early in the settlement by Armenians.  Our street was lined with olive trees, and in our yard, we also had pomegranate trees. My step-father, John C. Laney, would cure the olives in a lye bath; needless to say, we had an abundance of olives. Olives that are fresh off the tree are quite bitter, so they must be cured to remove the bitterness and make them more palatable. 


My daughter, Jazmin Bruton Davis, recently showcased her culinary talents by preparing a delightful feast for 2025 Thanksgiving. At my request, she made a pan of smothered turkey wings that were melt-in-your-mouth tender, alongside a pan of jerked turkey wings cooked by her friends, Chef Andre and Tasha. To complement the main dishes, she whipped up a creamy mashed potato salad that paired perfectly with her mac and cheese. The feast also featured a pan of savory dressing, bursting with flavors of herbs and spices, as well as sweet, syrupy candied yams, mustard greens, and an apple crumble cheese cake. 

Jazmin has always had a passion for cooking during the holidays, honing her skills in the kitchen since she was just ten years old. Growing up in the warm environment of Mother Bessie’s house, where she spent her first thirteen years, she was fortunate to have a grandmother who encouraged her culinary endeavors. Mother Bessie would let her assist in baking and glazing splendid lemon cakes, instilling in her the joy of cooking. Over the years, Jazmin has mastered various recipes and developed a deep familiarity with the kitchen, igniting her desire to take the reins and host our Thanksgiving meals in the future.

Grandma's Cornbread Dressing

1 cup self-rising cornmeal, I used  Goya Harina de Maiz, finely ground, 1/2 cup self-rising flour, I used all-purpose bleached flour, 3/4 cup evaporated milk, 2 eggs, 2 tablespoons Vegetable oil

Dressing Ingredients
8 tablespoons butter (1 stick)
3 medium onions, chopped
4 stalks of celery, chopped
1 1/2 teaspoons dried sage
1 teaspoon poultry seasoning
3/4 teaspoon salt
1/2 teaspoon pepper
3 pieces of toast, crumbled
1/2 cup milk
3 eggs, lightly beaten
2 to 2 1/2 cups chicken stock or broth
2 tablespoons butter
Instructions
1. Preheat oven to 400 degrees.
2. In a medium bowl, stir together all ingredients for cornbread. Pour into a lightly greased 9-inch cast-iron pan or a 9-inch baking pan. Bake for 20 to 25 minutes. Before using, crumble it into small pieces.
3. Heat butter over medium heat in a large pan. Add celery and onion, and cook until they are soft.
4. Add sage, poultry seasoning, salt, and pepper to the onion mixture.
5. In a large bowl, combine crumbled cornbread and toast.
6. Whisk together milk and eggs and add to the bowl. Could you stir in 2 cups of chicken broth?
7. Stir in the onion mixture. The mixture should be very moist. Please add more broth if needed.
8. Transfer to a greased baking dish. Cut butter into tiny slivers and scatter on top of the dressing.
9. Bake at 350 degrees for 30 minutes or until it turns light brown on top.

Recipe Notes
Note: The cornbread should be made a day or two in advance. And the veggies should be cut up in advance, so all you have to do is combine all ingredients and put them into the oven on Thanksgiving morning
.

Recipe Notes for Cured Olives Lye Bath: By Tracy Ariza, DDS, November 13, 2021

Water-cured olives are generally smashed or sliced before soaking in water to reduce the cure time. (It still generally takes around a week to remove the bitterness.) Whole olives would take much, much longer. By curing the olives in lye, the cure time for whole olives is greatly reduced. Lye curing is also more effective at removing bitterness. Lye cures some of them, and water or salt cures the rest of the olives.

Ingredients

To make lye-cured olives, you’ll need a batch of green ripe olives. You’ll also need some lye (also known as caustic soda, sodium hydroxide, or NaOH). While some people successfully cure their olives with lye found in the cleaning section and sold as drain cleaner, I prefer to use food-grade lye. (If you do use lye from the cleaning section, make sure that it only includes lye and no other chemical additives.) Apart from the lye and the olives, you’ll need some filtered (unchlorinated) water. You’ll also need some salt for brining the olives after curing them in lye. This will add flavor and will help preserve the olives.

For added flavor, you can optionally add some herbs, spices, garlic, and/or vinegar. You should also have some olive oil on hand to pour over the surface of the brined olives to keep them from being exposed to air. (This will prevent mold formation.)


Saturday, March 22, 2025

Corned Beef Brisket Way Past St. Paddy's Day


Easy peasy! I should warn you, though—since this recipe is practically effortless, you’ll be tempted to make it more often than once a year. There’s no judgment here; I’ve had it twice this month! After all, I can just chalk that up to “recipe testing,” right?

Ingredients

1 3-pound corned beef brisket, plus pickling spice packet

8 whole cloves

8 cloves garlic, peeled

4 bay leaves

24 baby carrots, tops trimmed to 2 inches

1 pound baby Dutch potatoes

2 tablespoons chopped fresh parsley leave

Place corned beef brisket and fat side up in a slow cooker; sprinkle with pickling spice.

Place whole cloves throughout the brisket. Add garlic, bay leaves, and 2 cups water, or more water as needed, to cover the brisket by at least 1 inch.

Cover and cook on low heat for 4-5 hours. Add carrots and potatoes to the slow cooker. Cover and cook on low heat for 2-3 hours or until tender.

Thinly slice the corned beef against the grain. Serve immediately with cabbage, carrots, and potatoes, garnished with parsley, if desired.


Saturday, January 25, 2025

Brazilian Black Bean Soup

 Add to My Favorites

© Dotdash Meredith. All rights reserved. Used with permission.

Brazil’s cuisine often features smoky, grilled meats, but this vegetarian bean soup recipe is entirely meat-free. Instead, blackened jalapeños, fire-roasted tomatoes, and smoked paprika provide the Brazilian flair. A little molasses adds a sweet-toasty note, and the kale, while not traditional, bumps up your daily veggie count.


Prep/Cook Time: 1½ Hours, Servings: 8
Ingredients
2 jalapeño peppers
2 tablespoons extra-virgin olive oil
3 cups chopped onion
1½ cups diced carrot
5 cloves garlic, minced
4 cups low-sodium vegetable broth
4 15-ounce cans low-sodium black beans, rinsed
1 28-ounce can of fire-roasted diced tomatoes
3 tablespoons molasses
2 tablespoons lime zest
5 tablespoons lime juice
1½ teaspoons ground cumin
1½ teaspoons smoked paprika
⅛ teaspoon cayenne pepper, or to taste
3 bay leaves
1 teaspoon salt
¾ teaspoon ground pepper
4 cups chopped kale
Chopped scallions & chopped fresh tomato for garnish

Directions

Heat a medium skillet over high heat. Split jalapeños in half lengthwise, remove ribs and seeds, and place skin-side down in the pan. Cover the pan with foil and cook until the skins are blackened 7 to 10 minutes. Let cool, then dice.

Meanwhile, heat oil in a large pot over medium-high heat. Add onion and carrot and cook, stirring often, until starting to brown 6 to 8 minutes. Reduce heat to medium and continue cooking, stirring often, until soft, 3 to 5 minutes more. Add garlic and the diced jalapeños and cook, stirring, for 1 minute more.

Stir in broth, scraping up any browned bits. Cover and bring to a boil over high heat. Add beans, tomatoes, molasses, lime zest, juice, cumin, paprika, cayenne, bay leaves, salt, and pepper. Cover and return to a boil. Reduce heat to maintain a gentle simmer and cook, un­covered, for 30 minutes.

Remove bay leaves. Puree 4 cups of the soup in a blender (use caution when pureeing hot liquids), then stir it back into the pot. Stir in kale, cover, and simmer until tender, about 5 minutes. Serve garnished with scallions and tomatoes, if desired.


Thursday, January 23, 2025

Plant Based Vegan BigMAC

 2025 has begun with a few of my family and friends sharing great recipes and meal prep ideas.  Shonna McDaniel's is into her vegan mode and crafting excellent, delicious plant-based dishes.  Here is a vegan & plant-based meal to try.  

This delicious vegan Big Mac McDonalds replica can be made in 10 minutes at home using easy-to-find ingredients! Anyone in your household will find this burger tasty with my vegan Big Mac sauce included! 

If you have non-vegans in your household, it’s quicker to make this vegan Big Mac at home than it is driving and waiting in line to order a non-vegan McDonald’s Big Mac (not to mention healthier, fewer calories,  cheaper, and better for the environment)

Ingredients for the burger patties:

  • 1 can of black beans, drained and rinsed
  • 1/2 cup of cooked brown rice
  • 1/4 cup of bread crumbs
  • 1/4 cup of chopped onions
  • 1/4 cup of chopped green pepper
  • 1 tablespoon of soy sauce
  • 1/2 teaspoon of garlic powder
  • Salt and pepper to taste

To make the burger patties, combine all the ingredients in a food processor and blend until the mixture is smooth. Divide the mixture into four equal portions and form each into a patty shape. Place on a baking sheet lined with parchment paper and bake in the oven for 20-25 minutes. 

For the special sauce

  • 1/4 cup of vegan mayo
  • 2 tablespoons of vegan Thousand Island dressing
  • 1 tablespoon of yellow mustard
  • 1 tablespoon of finely chopped onions
  • 1 tablespoon of sweet pickle relish
@ Healthy Vegan Eating

Heat a grill pan over medium-high heat. Cook the burgers on each minute for 3-4 mins until heated through (or according to the package instructions if different).

While the burgers are cooking, chop your onions, lettuce and pickles.

To make the middle bun of the Big Mac, you can cut the top off the bun, so your bun has 3 parts.

Lightly toast all three bun parts by tossing them on the heat grill pan, face down, for 1 min, covered.

To assemble the burger, spread ½ to 1 tbsp Big Mac sauce over the bottom piece of each bun.

Then, add some minced onion, iceberg lettuce, one vegan cheese slice, one burger patty, and three pickle medallions (like at the restaurant).

Put the middle portion of the bun on next and spread with another 1 tbsp of Big Mac sauce, topped with onion, some lettuce,1 vegan cheese slice, 2nd burger patty, pickle medallions, and burger bun with more Big Mac sauce.

To melt the cheese, microwave each burger for 30 seconds or heat it in a pan with a cover.

Serve with a side of fries.

Nutrition Information

Serving size: 1 Burger Calories: 465 Fat: 24g Saturated fat: 6.4g Trans fat: 0mg Carbohydrates: 35.8g Sugar: 5.9g Sodium: 1432mg Fiber: 4.3g Protein: 27.2g Cholesterol: 0mg

Morning Star Farms- 

Hurry the Food Up

Sunday, July 7, 2024

Award Winning Rib Rub for Baby Back Ribs

Award Winning Rib Rub for Baby Back Ribs

The secret recipe!

PREP TIME 5 minutes mins

COOK TIME 5 minutes mins

TOTAL TIME 10 minutes mins 

COURSE Dry Rub CUISINE American CALORIES10 kcal

INGREDIENTS

3/4 c Paprika

1/4 c Granulated Garlic

2 tbsp. Chili Powder

2 tbsp. Salt

1 tbsp. Cayenne

1 tbsp. Cumin

1 tbsp. Black Pepper

2 tsp. Oregano

2 tsp. Onion Powder

1 tsp. Thyme

INSTRUCTIONS

Combine all ingredients in a medium-sized bowl. Apply rub liberally to your baby's back ribs.

Use this rub or either baby back ribs or St Louis-style spare ribs. Apply just enough rub that you can still see some of the meat, pat it into the ribs, and let it stand for at least 30 minutes before placing the ribs in your smoker.

How Long Should the Rub Be on the Baby Back Ribs Before Cooking?

I like to let the rub sit on the meat for at least 30 minutes and up to an hour before the ribs go on the smoker. That is about how long it takes for the salt to draw moisture out of the meat and turn the remaining ingredients into a paste that looks like it is melting into the meat.

Some people like to prep ribs the day before cooking them and let the rub sit on the meat overnight. While there is nothing wrong with letting the rub sit overnight, I have not found that the extended time provides any meaningful benefit.

What Do You Use to Get the Rub to Stick to the Ribs?

You have several options for getting the rub to stick to the ribs.

The first option is to take your time. Sprinkle the rub onto the meat side of the ribs and wait 30 minutes for the rub to melt into the meat before flipping them over and applying the seasoning to the bone side.

You could also use a binder to help the rub adhere. Standard binders include a thin layer of olive oil, yellow mustard, or mayonnaise.

The flavor of the binder does not come through in the finished ribs.

This is a Dry Rub for "Low" and Slow" Ri" s

This rub has two types of sugar, so it should only be used if you cook your ribs at a low temperature.

If you try using this rub for high-heat grilling, the sugars will scorch, and the ribs will come out dark and bitter…and nobody has time for that!

I'm begging you, please don't your ribs.

There are MUCH better ways to get the tenderness you're looking for in a rack of ribs. The method I'm using will also allow you to infuse flavor into your ribs, which boiling does not. I have spent a lot of time researching and practicing ribs. I could write pages about all the details, but for now, I'll stick to the basics of what you need to know to make championship ribs.

Set up your grill for indirect heating (or use your smoker) and remove some fruitwood.

The first step to making a good rib is peeling the membrane off the back. This thin, skin-like covering on the bone side of the ribs prevents flavor from entering. You can ask your butcher to remove it. If you're doing it yourself, use a paper towel and pull it from one end to the other. Once you get it started, it comes off easily.

Let the ribs set, and let that rub soak in marinate for 30 – 60 minutes.

Place the ribs on your grill, far away from heat. Smokers are convenient because they allow you to get great smoke into your ribs without the fear of scalding them. You can still make it work on your grill—just be careful. Keep the temperature in the 225 range. If grilling at high temperatures is your only option, check out this Hot and Fast Baby Back Rib recipe.

We use a variation of the 3-2-1 method for our ribs. Smoke-Wrap-Baste.  The variation is all up to you. How much smoke do you want –  a lot? Then stick to 3 hours. Then 1 hour is plenty. The answer lies in the 1 – 3 hour range, and it's up to your distaste buds to decide.

The next step is to wrap. Easy – just individually wrap them in heavy-duty aluminum foil.

Similar to the first step, the timing is all up to you. I have found wrapping takes at least an hour, usually at most two hours. It's all about getting them to the perfect tenderness—not falling off the bone. If you wanted that, you could have thrown them in a crockpot. Anyone can make them fall off. Your guests will drool with jealousy and amazement when they pull clean from the bone when you take a bite.

The last step is to glaze. If your sauce smears, don't take it easy on your ribs. You don't want to rub it off.

I would like to bring some heat back, so I'll use a spicy sauce here, but it's your preference. I use a spicier sauce and then drizzle a bit of dark brown sugar to balance the flavors. But then again, I really like sugar. And like the other steps, the time is up to you. The longer you leave them on this step, the more firm the sauce will become. 

 If you wish to use the traditional dry Memphis style, skip this step!


Sunday, April 21, 2024

VINTAGE Deviled Egg Platter w/ Salt & Pepper Shakers Set Japan

  I was thrift store shopping this weekend with Suzetta Withtaker and my granddaughter found this darling vintage deviled egg platter. Of course, I had to make some deviled eggs to accompany it today. 

I already had some pickled, boiled eggs in the fridge from Easter weekend. I cut the eggs in half, removed the yolk, mashed the egg yolk, added mustard, mayo, and spicy mayo. I topped it with black olives and a shake of paprika. 


LATEST NEWS   The Benefit Shop Foundation Inc.

Egg-actually the Right Time for Collectible Deviled Eggs Platters 

This is the time of year that many pull out a plate they haven’t seen for a year — the deviled egg platter, or egg plate, with its perfect oval indentations. Deviling is a term for mixing hot spices into foods. Serving deviled eggs is common during the Easter season. The deviled egg first became a popular snack for drinks during the 1930s. Hundreds of deviled glass or china egg plates were made to showcase the appetizer. 

American egg plates can be found in many Depression glass patterns. Duncan & Miller Glass Company is considered the earliest version of the Early American Sandwich pattern. Imperial, Heisey, Spode, Lenox, Anchor Hocking, Fenton, Fire King, Fostoria, Hazel Atlas, Indiana, Jeannette, and Pyrex are just a few of the other well-known glass makers who make egg platters. During the 1950s and 1960s, many china patterns included a deviled egg plate, and the egg plate’s popularity peaked in the 1950s. 

Today, you can find deviled egg platters in thrift stores, flea markets, and other online vintage sellers. Or you can just check your mother or grandmother’s china cabinet!  

Here are some collectible platters for those who love the cooked egg yolk, mustard, and mayonnaise mixture topped with paprika and put back into a half egg-white “shell.” 


Sunday, December 10, 2023

CURRIED OXTAILS

 The deep, rich flavors of a traditional spice paste fortified with curry leaves and curry powder are beautifully combined with the hearty taste of slowly stewed oxtails. Serve with rice or lontong  (an Indonesian traditional rice dish), and a little Pickled Fruit Salad or Mango Sambal on the side. 


SPICE PASTE

1-inch piece of ginger

1 stalk lemongrass

1 medium onion coarsely chopped.

6 cloves garlic

2 fresh red or green jalapeno chilies, seeded.

1 tablespoon chili garlic sauce

1/4 cup of water


1 medium potato

1 medium carrot

1/2 small jicama

2 pounds oxtail, cut into segments.

2 tablespoons cooking oil.

2 tablespoons curry powder

2 cinnamon sticks

10 dried curry leaves (optional)

1 can (13 ½ oz.) unsweetened coconut milk

3 cups water

¼ cup soy sauce

1 tablespoon packed brown sugar.

Mint leaves


Getting Ready

1.      Thinly slice ginger and bottom 6 inches of lemongrass. Place in blender with remaining spice paste ingredients and process until smooth.

2.      Peel potato, carrot, and jicama. Cut potato into 1 ½ inch chunks, carrot, and jicama into small cubes.


Cooking

1.      In a large pan, parboil oxtail in water to cover for 5 minutes; pour into a colander and let drain.

2.      heat oil over medium-low heat until hot in the same pan. Add the spice paste and cook, stirring, until fragrant—6 to 8 minutes. Add curry powder, cinnamon sticks, and curry leaves.

3.      Return the oxtails to the pan, stir them, and coat them with seasonings. Add coconut milk, water, soy sauce, and brown sugar. Bring to a boil; reduce heat, cover, and simmer until meat is tender, 1 ½ to 2 hours.

4.      Add vegetables to meat; cover, and simmer for 30 minutes or until all vegetables are tender when pierced.

5.      Ladle into bowls and garnish with mint leaves.

6.      Makes 6 servings.


CURRY LEAF

Curry doesn't grow on trees. It's a seasoning blended from many spices. So, what, then, is a curry leaf? It is the shiny dark green leaf of a South Asian plant that smells a lot like curry when it's crushed (though the resemblance is purely coincidental since the plant is not related to any of the curry species. 

Curry leaves figure prominently in South Indian and Malaysian cooking. You can sometimes find fresh ones in Indian markets, but you're more likely to find them dried. To release their aromatic essence, crush them in a mortar and pestle or grind them in a spice grinder.  


From India To Thailand, a Guide To the World’s Curries

Characteristics: Caribbean curries, unlike in India, are generally prepared with pre-made curry blends high in turmeric. They often include cumin, paprika, cardamom, garlic, and fenugreek. Those are then made into a paste or powder, added to a protein, and marinated before cooking. The powder is also added to the pan before cooking, creating popular dishes like curry goat and curry chicken.


“Jamaicans, we like to see that bright yellow,” says Hugh Sinclair, a native Jamaican who goes by Chef Irie and hosts “Taste the Islands” on public television in South Florida.


You’ll find this curry style throughout the British West Indies, varying slightly from island to island. But places like the Cayman Islands (which used to be part of Jamaica) and other islands nearby will have very similar styles.


Origins: Jamaica’s curries were heavily influenced by British colonial rule, and as such, they’re based more on pre-made curry mixes than anything families make themselves. That said, once slavery was abolished and Indians came to the islands to work in the sugarcane fields, more Indian-style curries became prevalent. So, while the traditional Jamaican curries are more popular, you can find Indian styles throughout the country.


“In Jamaica, we have a large Indian population, and in Indian households, they’re making their own curries,” says Sinclair. “They’re mixing the spices in real-time when cooking the dishes like in mainland India.


Characteristics: Traditional Indian curries are generally based on coconut milk with a salt or acid component like lime juice, garlic, ginger, tomatoes, onions, and two spices, usually turmeric and curry leaves, sometimes cumin. Further inland, dried coconut replaces coconut milk, and you’ll find other meats like chicken used instead of fish. Coastal Indian curries will be more coconut milk and turmeric-based, with a yellowish color. Inland curries use more tomatoes and are redder in color.


“Even in India,” Irani warns, “you’ll find three different people arguing over what a curry should be.”


Origins: Curry was primarily developed in southern parts of India, and though you might see recipes for North Indian curries, this is more just a generic term for sauce-based dishes from that region. As Irani said, it’s really only one dish, not an entire collection of dishes. And definitely not a spice blend. Initially, it didn’t have much in the way of tomatoes, onions, garlic, or ginger. Still, when Europeans came to India, they brought those ingredients, simultaneously borrowing and helping to develop food in another land.

Saturday, December 9, 2023

Vegetarian Stuffed Acorn Squash

Thanksgiving Day in 2024 was a special occasion for my family, as it was the first time in twenty years that we were all together in one city and state. Previously, we used to be scattered across different locations like California, Florida, Germany, Georgia, Maryland, and Chicago. This year, my oldest son was able to join us, which was a great addition.  I used to have dinner with friends and host small parties while my family visited their respective families (divorce does that). However, this year was different, and we could all enjoy the holiday together.


Dani's  art project, she built a "Lego Cockatoo."

Cozy, vegetarian acorn squash stuffing for Thanksgiving.

 I’m really excited to share this recipe with you. Roasted acorn squash halves topped with herbed stuffing make a delicious holiday-worthy main dish. It’s the perfect option if you’re serving vegetarian and gluten-free eaters.


Ingredients:

2 Whole Acorn Squash

Simply Nature Organic Extra Virgin Olive Oil

Salt and Pepper to season the squash

3 tablespoons Countryside Creamery Sweet Cream Salted Butter

2 Stalks of Celery, chopped

1 Small Yellow Onion, chopped

3 Cloves Garlic, minced

2 teaspoons Stonemill Ground Sage*

1 teaspoon Stonemill Rosemary Leaves*

1 teaspoon Stonemill Thyme Leaves*

1 teaspoon Stonemill Paprika

1 teaspoon Stonemill Sea Salt

1/2 teaspoon Stonemill Ground Black Pepper

1 Box Chef’s Cupboard Tuscan Seasoned Sourdough Stuffing*

1/3 cup Southern Grove Dried Cranberries

1/3 cup Southern Grove Chopped Pecans

2 Green Onions, sliced

1 ½ cups Chef’s Cupboard Vegetable Cooking Stock

2 Simply Nature Organic Cage Free Brown Eggs, slightly beaten

Acorn Squash Stuffing

Directions:

Preheat oven to 425 degrees and line a baking sheet with parchment paper.

Microwave the acorn squash for 2 minutes to soften slightly before cutting each in half. Scoop out the seeds to create a hollow in the center of each.

Lightly brush each squash half with olive oil, season with salt and pepper, and place the squash face on the prepared baking sheet. Roast for 20-25 minutes or until tender, but not mushy, when pierced with a fork.

Prepare the stuffing by heating the butter in a large pan over medium heat. Add the celery, onion, and garlic, and season with sage, rosemary, thyme, paprika, salt and pepper. Cook for 3-4 minutes until veggies are starting to soften.

Remove from heat and add one complete package of Chef’s Cupboard Tuscan Seasoned Stuffing, dried cranberries, green onions, and pecans. Stir to combine.

Add vegetable stock and egg, stirring to combine.

Spoon stuffing mixture into roasted acorn squash halves. Return to the oven to continue roasting at 425 degrees for 10 minutes until the stuffing is browned and the squash is caramelized.

Recipe courtesy of @phenomenalphoods.

Monday, November 6, 2023

Vegan Cauliflower Roast

Thanksgiving Recipes Will Appeal To Everyone At The Table

Looking for a plant-based entree everyone will love? This flavor-packed cauliflower roast might steal the show with its savory blend of seasonings and the sweet, spicy, and umami balance of Fly by Jin Zhong Sauce. Nugget Market is my favorite.


INGREDIENTS

1 head cauliflower

1 tablespoon sesame oil

4 tablespoons vegetable oil

2 cloves garlic, chopped

2 tablespoons sesame seeds

1/2 teaspoon turmeric

1 teaspoon salt

1/2 cup Fly by Jing Zhong Sauce

PREPARATION

Preheat oven to 350

Remove the outer leaves from the cauliflower, leaving the head intact. Combine sesame oil, vegetable oil, garlic, sesame seeds, turmeric, fennel seeds, and salt to form a paste. Rub the paste evenly over the surface of the cauliflower head, pressing into all the nooks and crannies.

Place the cauliflower on a lined baking sheet and roast for 40 minutes. Baste liberally with Zhong Sauce and return to the oven to glaze for about 10 minutes, until just tender,

To serve, slice cauliflower roast into slabs or cut into florets.

Balsamic-Glazed Roasted Cauliflower


A whole roasted cauliflower makes for a fantastic vegan main dish. This one is roasted around extra veggies and has a slightly sweet balsamic glaze. It's easy to throw together and will leave you feeling full, not heavy. Win!

Vegan Sweet Potato Pie

@Kat Wirsing

This sweet potato pie is extremely good, thanks to an oat pecan crust and a creamy, spiced filling. Look for vegan marshmallows to top it, or keep it simple with your own vegan whipped topping using coconut cream.

Ingredients

FOR THE CRUST

Cooking spray

1 1/2 c. pecans

1/2 c. old-fashioned oats

1/2 c. dark brown sugar

1/2 tsp. ground cinnamon

1/4 tsp. kosher salt

1/2 c. melted coconut oil

FOR THE FILLING

1 (15-oz.) can sweet potato purée

1 c. almond milk

3/4 c. dark brown sugar (substitute diabetics Pyure Organic Brown Sweetener ) 

2 tbsp. cornstarch

1 tsp. pure vanilla extract

1 tsp. ground cinnamon

1/2 tsp. kosher salt

1/4 tsp. nutmeg

1/4 tsp. ground ginger

FOR THE TOPPING

1 (13.5-oz.) full-fat coconut cream, refrigerated (Taste of Thai works best)

3 tbsp. powdered sugar (omit if you are diabetic)

Pinch kosher salt

Pyure Organic Brown Sweetener | Brown Sugar Substitute | Zero Carb, Zero Sugar, Zero Calorie | Measures and Bakes Like Brown Sugar | Plant-Based for Keto...

Sunday, July 23, 2023

African American Food Culture

 by William Frank Mitchell (Author)

The Original Innovators PHOTO: ORIANA KOREN

Like other Americans, African Americans partake of the general food offerings available in mainstream supermarket chains across the country. Food culture, however, may depend on where they live and their degree of connection to traditions passed down through generations since the time of slavery. Many African Americans celebrate a hybrid identity that incorporates African and New World foodways. The state of African American food culture today is illuminated in depth here for the first time, in the all-important context of understanding the West African origins of most African Americans of today.

Like other Americans, African Americans partake of the general food offerings available in mainstream supermarket chains across the country. Food culture, however, may depend on where they live and their degree of connection to traditions passed down through generations since the time of slavery. Many African Americans celebrate a hybrid identity that incorporates African and New World foodways. The state of African American food culture today is illuminated in depth here for the first time, in the all-important context of understanding the West African origins of most African Americans of today.

A historical overview discusses the beginnings of this hybrid food culture when Africans were forcibly removed from their homelands and brought to the United States. Chapter 2 on Major Foods and Ingredients details the particular favorites of what is considered classic African American food. In Chapter 3, Cooking, the African American family of today is shown to be like most other families with busy lives, preparing and eating quick meals during the week and more leisurely meals on the weekend. Special insight is also given to African American chefs. The Typical Meals chapter reflects a largely mainstream diet with regional and traditional options. Chapter 6, Eating Out, highlights the increasing opportunities for African Americans to dine out and the attractions of fast meals. The Special Occasions chapter discusses all the pertinent occasions for African Americans to prepare and eat symbolic dishes that reaffirm their identity and culture. Finally, the latest information on the traditional African American diet and its health effects brings readers up to date in the Diet and Health chapter. Recipes, photos, chronology, resource guide, and selected bibliography round out the narrative.

Cover Copyrighted by William Frank Mitchell (Author) 


Thursday, March 16, 2023

Peanut Boil History


Diana L. Bruton

https://nationalpeanutboard.org/peanut-info/history-boiled-peanuts-from-necessity-to-southern-delica

cy.htm

When or why Southerners started boiling peanuts no one knows exactly. But good ideas have a way of spreading and, today, Southerners know how great boiled peanuts are. Not only are boiled peanuts called “the caviar of the South,” but they are also the official state snack of South Carolina. From Labor Day on into the holiday season, boiled peanuts are abundantly available at roadside stands, gas stations, ball games, festivals, and anywhere else people gather for fun.

History gives us clues about the origin and growth of the popularity of boiled peanuts.

Colonial Days:

Peanuts were first brought to America by slaves from Africa and the practice of boiling peanuts probably originated here. If there was a surplus peanut crop, field workers would hold a “peanut boil” to celebrate with shared conversation and food. 


Saturday, February 4, 2023

BAYOU JAMBALAYA

 https://pioneerbrand.com/our-heritage/


I was looking for an excellent stew to take the chill off this cold Chicago weekend.  I pulled this seasoning mix packet out of the bend, which had been there for months. I decided to try it tonight. It was so GOOD!  I have to tell everyone to try it. Mind you this isn't a commercial or a paid advertisement, I just found a brand that I'm willing to try again and again, especially for a quick hot meal.  I omitted the rice.  Since I'm on this diabetic diet.

A kickin’ culinary staple now straight from your kitchen! This easy-to-prepare jambalaya is even easier to devour with hearty ingredients and delicious Creole flavors. Yields 5 serving

BAYOU JAMBALAYA

Prep Time: 10 minutes

Cook Time: 15 minutes

1 pkg. Pioneer Bayou Jambalaya Meal Seasoning Mix

2 ¼ cups water

1 cup parboiled long-grain rice

1 lb. meat of choice – smoked sausage, cooked chicken, or shrimp*

Optional: ½ cup chopped green bell pepper, ½ cup yellow onion, and 1 (14.5 oz.) can dice tomatoes**

Mix seasoning mix with water in a 3-quart saucepan, and bring to a boil.

Add rice meat of choice.

Simmer covered for about 20 minutes until rice is tender.

Remove from heat, and let stand for 5 minutes.

Fluff with a fork before serving.

*Add cooked shrimp during the last 5 minutes of cooking time.

**Saute peppers and onions in 1 tbsp oil. Proceed to Step 1, and add the diced tomatoes before boiling them.

NOTES: 

TSHA | Guenther, Carl Hilmar (tshaonline.org)

GUENTHER, CARL HILMAR (1826–1902).Carl Hilmar (Hilmer) Guenther, pioneer miller, son of Carl Gottfried and Johanne Rosina (Koerner) Guenther, was born at Weissenfels on the Saale River in Germany on March 19, 1826. He was one of eight children, the first of this line to migrate to America. In 1848 he traveled to New York and then to Wisconsin and down the Mississippi River before returning to Germany for a few months. Around 1851 he returned to America, landed in New Orleans, and traveled to Indianola, Texas. From Indianola he trudged the 250 miles to San Antonio beside a provision wagon. In San Antonio he heard of the need for a gristmill and flour mill in Fredericksburg, so he traveled there and built his first mill on Live Oak Creek nine miles west of Fredericksburg. He excavated the mill race with a pick and shovel and designed and made the waterwheel and gears of native woods. After a flash flood swept away an incomplete dam, he rebuilt from the ground up. In 1855 he married Dorothea (Dorathea or Dorethea) Wilhelmine Henriette Pape in a Lutheran ceremony in the first community church. They had seven children. Guenther was Fredericksburg justice of the peace in 1856. After two years of drought had depleted the crops and water supply, the family moved to San Antonio in 1859. By October of that year, on the bank of the San Antonio River at the foot of King William Street, Guenther had built the first flour mill in the city. In 1898 his mills were incorporated as C. H. Guenther and Son; the name was later changed to Pioneer Flour Mills. Guenther also established a small ice plant called the Southern Ice Company (later Southern-Henke Ice Company). He helped found San Antonio's German-English School and held membership in the Beethoven Männerchor, the Arbeiter Verein, and the Casino Club, San Antonio's first social club and theater. Guenther and his descendants constantly improved and enlarged the mills. By 1900 their 200-horsepower engine was the largest in the city. Guenther died on October 18, 1902, in San Antonio and was buried beside his wife in City Cemetery No. 1

Tuesday, December 27, 2022

2021 Looking Back, Looking Forward


October 18, 2021, in Orlando, Dani's Birthday Dinner

October 18, 2021, in Orlando, Dani's Birthday Dinner

This idea everyone was invited to contribute to the appetizer table. So much food to share. Dani started with the vegetable and the dip but was encouraged by her mother to eat a little of everything, not just the vegetable tray her grandmother put on the table.  It was humorous and had everyone laughing. Needless to say, there were a lot of leftovers. 

This was the night before we all went to Disney World to celebrate her birthday party.

Jazmin, Elizabeth, Kiambra, and Dani

Grandma Alpha, Dani

Uncle Tarri


Saturday, November 26, 2022

Family Thanksgiving Dinner 2022 at Jazz's


Jazmin's Thanksgiving Dinner Plated

MENU

 Turkey Wings Creole Injected 
Cornbread Stuffing
Cranberry Sauce
Mustard Potato Salad
Cheesy Mac and Cheese
Mixed Collard Greens
Glazed Sweet Potato with Marshmallow
 Apple Cranberry Cider Vodka Cocktails

My daughter Jazmin hosted "Thanksgiving Dinner" this year in her new home. This is the first of many as she celebrates the holiday season and gives thanks for now being a landowner. For dinner, she prepared everything from scratch. All the dishes were superb. I had seconds and then crashed from the "idis."  or waiting all afternoon to enjoy her cooking without ruining it by eating lunch. It was well worth the wait. 

Funny, we were so anxious to get to dinner, pray, and eat that no one took pictures of the presentation table. There was a fabulous bouquet of flowers that had a height and was the centerpiece of the wet bar island.

Our family had so much to be thankful for that we all reside in one state now and could be together this year. That we are all present after the worst pandemic in the history of mankind. Amazingly, we all survived. I am most grateful for seeing my family come together to celebrate 2022. 

Turkey Wings Injected 

Turkey Wings Injected 

 You have to have these three: bell pepper, celery, and onion.

Cornbread Stuffing 


This is THE best Southern cornbread stuffing recipe for Thanksgiving. It's rich, savory, and flavorful without using a pound of butter. This traditional stuffing recipe needs to be on your holiday table!

Favorite holiday food of all time? Mine is stuffing, hands down. What could be better than a pan full of carbs? Bread AND cornbread with a rich, savory, buttery, herby flavor that only comes around once a year? Pass me a fork!
Southern cornbread stuffing is one of those Thanksgiving dishes that never seems to have a recipe when our family makes it, but it always turns out absolutely delicious. Like, the best. And I have always wanted to share the absolute best ever cornbread stuffing with you for Thanksgiving, so I set out to find (or build) our family recipe. Turns out, there's not one. But I've finally recorded my favorite recipe for traditional Southern cornbread stuffing without using obscene amounts of butter.

WHY YOU'LL LOVE THIS STUFFING
This is the quintessential cornbread stuffing recipe that comes to mind with mentions of Thanksgiving (at least for me!). It's homey and savory, full of flavor from herbs, aromatic veggies, broth, and butter. It takes a little time and prep work, but it's easy to make. And the results are SO worth the effort, especially for Thanksgiving dinner. And a little bonus? It's a little healthier than many recipes!

WHAT MAKES THIS STUFFING HEALTHIER?
Not that stuffing for the best food day of the year needs to be healthy, but this stuffing is better for you without sacrificing flavor or coziness. This stuffing uses just a bit of butter (3 tablespoons for a whole pan, which is not much comparatively) and derives a lot of the delicious savory flavor from broth and aromatics. My homemade cornbread, which uses whole wheat flour, can be even better for you.

THE INGREDIENTS
1/4 cup (1/2 stick) butter
1/2 cup chopped celery
1/2 cup chopped onion
1 package (8 ounces) of unseasoned stuffing mix
2 cups chicken broth
1 1/2 teaspoons McCormick® Ground Sage
1/2 teaspoon McCormick® Ground Thyme
  • Cornbread - IMO, homemade is best! You'll want to make some at least the day before you plan to make stuffing. I use my healthier cornbread recipe.
  • Bread - Really, any type of bread is acceptable. Sandwich bread, whole wheat bread, French bread, whatever you have. I typically save the butt ends of my bread loaves and any bread I won't eat before it goes wrong in the freezer for stuffing later.
  • Onion, Celery, and Garlic - Classic flavoring elements in any good stuffing recipe.
  • Parsley, Thyme, and Green Onion - Lots of herbs for so much flavor! You can add any other you like, such as sage or rosemary.
  • Butter - Not too much, just enough for a classic rich flavor.
  • Eggs - They help bind everything together.
  • Broth - I use my homemade chicken broth or low-sodium store-bought broth

HOW TO MAKE IT
  1. 12-image collage showing steps for making cornbread stuffing.
  2. Cube the bread and cornbread and let it get stale, either by leaving it on the counter overnight or by toasting it in the oven for about 20 minutes.
  3. Chop the parsley, thyme, and green onion. Add the stale bread and cornbread to a large bowl with the chopped herbs.
  4. Chop the onion, celery, and garlic.
  5. Melt the butter in a saucepan. Add the onion, celery, and garlic and cook until slightly softened.
  6. Add most of the broth to the saucepan with the onion mixture (reserving about ½ cup). Simmer for about 5 minutes.
  7. Pour the onion and broth mixture into the bowl with the bread and gently stir to coat.
  8. Whisk the eggs with the remaining broth, salt, and pepper. Pour into the bowl with the bread and stir to coat everything evenly. If the bread still looks dry, add a little more broth.
  9. Spread the stuffing mixture into a lightly greased baking dish. Cover and bake at 350°F for 45 minutes.
  10. Remove the cover and continue to bake for 10-15 minutes, until the top is lightly browned.

 Mustard Potato Salad


3 pounds medium russet potatoes
1cup mayonnaise
1/4 cup yellow mustard
2 teaspoons apple cider vinegar
2 teaspoons sugar
1/2 teaspoon onion powder
1/4 cup sweet pickle relish
1 stalk celery, chopped
1/2 sweet onion, chopped
4 hard-boiled eggs, 3 chopped and 1 sliced
paprika

Instructions
Cut each potato in half. Cut each potato in half. Place in a large pot and cover with 1 inch of water. Add 2 teaspoons of salt and bring to a simmer. Simmer until fork-tender all the way through, about 20 minutes. Drain well. Let cool and then peel and discard the skins. Run a knife through them until they are cut into bite-sized pieces.

Mix mayonnaise, mustard, vinegar, sugar, and onion powder in a small bowl. Pour over potatoes and mix in well. Add relish, celery, onion, and the hopped eggs. Mix in. Could you add salt and pepper to taste? Top with sliced egg and sprinkle with paprika. Cover with plastic wrap and refrigerate for at least 4 hours.

 Mixed Collard Greens

Photo by Sue Lau


Cutting or tearing into bite-sized pieces


This is how collards grow in the garden before picking.
 
1/2 pound smoked turkey  ( diced, about 6 thick slices)
 1 medium sweet onion, finely chopped
 1/4 pound smoked ham (chopped, optional)
 5 garlic cloves, finely chopped
 1 container (32 ounces) of chicken broth
 1 bunch (2 pounds) of fresh collard greens, Turnips washed and trimmed
 2 tablespoons apple cider vinegar
 2 tablespoons granulated sugar
 1/2 teaspoon salt
 1/2 teaspoon pepper

Step 1
Cook turkey in a heavy 10-qt. Stockpot over medium heat for 10 to 12 minutes or until almost crisp. Add onion, and sauté for 8 minutes.

Step 2
Add garlic, and sauté 1 minute.

Step 3
Stir in half the broth and the remaining ingredients. Cook until the desired degree of tenderness, keeping an eye on the liquid level and adding more as needed. I rarely add more than half (16 oz). It should have a layer of liquid at the bottom, but not be soupy. I usually cook for about 45-60 minutes.

Cheesy Mac and Cheese

Ingredients
2 cups uncooked elbow macaroni
1 tablespoon all-purpose flour
1 cup heavy whipping cream
1 cup half-and-half cream
1/4 cup sour cream
1 large egg
1/2 teaspoon ground mustard
1/2 teaspoon cayenne pepper
1/4 teaspoon salt
1/4 teaspoon pepper
1/8 teaspoon ground nutmeg
8 ounces Monterey Jack cheese, cubed
8 ounces of cheddar cheese, cubed
2 cups shredded cheddar cheese

Directions
Cook macaroni according to package directions. Meanwhile, in a large bowl, whisk the flour, cream, half-and-half, sour cream, egg, mustard, cayenne, salt, pepper, and nutmeg until smooth.
Drain pasta. Transfer to a greased 2-1/2-qt. Baking dish. Stir in the cubed cheeses. Top with cream mixture. Sprinkle with shredded cheese.

Bake, uncovered, at 350° until bubbly and golden brown, 30-40 minutes.


Vodka is essential to a well-stocked home bar. The smooth, easy-to-quaff liquor plays well in classic cocktails like martinis, gimlets, vodka tonics, cosmos, and all kinds of other fruity libations from frappés to spiked lemonade.

Cranberry Apple Cider Sangria


8 SERVINGS
750 mL red wine
3 cups apple cider (soft, non-alcoholic)
1 cup cranberry juice (unsweetened)
1/2 cup triple sec (or other orange liqueur)
1/2 cup honey (*, or 1/2 cup simple syrup made by heating equal parts of sugar and water over medium heat until dissolved)
1 cup frozen cranberries (or fresh)
sparkling water (to top off)
1 cup green apple (freshly diced red and/or cubes)
cinnamon sticks (for garnish, optional)
Order Ingredients

Resource Credits:
  1. https://livelytable.com/best-southern-cornbread-stuffing-recipe-thanksgiving/BY KALEIGH MCMORDIE - NOVEMBER 15, 2021THE BEST (HEALTHY-ISH) SOUTHERN CORNBREAD STUFFING RECIPE
  2. https://www.southernliving.com/recipes/best-ever-macaroni-and-cheese-recipe
  3. https://www.recipezazz.com/recipes/view_photos/8395
  4. https://www.yummly.com/recipe/Cranberry-Apple-Cider-Sangria-2116030
  5. https://spicysouthernkitchen.com/southern-potato-salad/
  6.  https://www.marthastewart.com/274340/vodka-cocktails?.