Friday, November 10, 2023

Arugula, Grilled Radicchio & Cherry Salad

https://www.nuggetmarket.com/recipes/1239/arugula-grilled-radicchio-and-cherry-salad/


Arugula, Grilled Radicchio & Cherry Salad

A citrusy vinaigrette, tart cherries, and crumbled goat cheese bring out the best in the charred radicchio and endive in this flavor-packed dish.

Ingredients

2 heads radicchio, cut into sixteenths

3 heads Belgian endive, halved

¼ cup balsamic vinegar

½ cup olive oil, divided

1 orange, zested and juiced

1 lemon, zested and juiced

1 bunch chives, chopped

1 bunch tarragon, chopped

5 ounces arugula

1 pound cherries, halved and pitted

Salt and pepper, to taste

2 ounces goat cheese, crumbled

Preparation

Combine the radicchio and endive in a work bowl. Add the balsamic vinegar and ¼ cup olive oil and toss to coat. Let marinate for 15 minutes.

Heat the grill to medium-high heat. Grill radicchio and endive until just charred, about 1 minute per side. Remove from grill, arrange on a platter or sheet pan in a single layer, and place in refrigerator to cool.

Combine orange and lemon juices and zest in a small sauce pot. Reduce by half and cool to room temperature. Whisk in the chopped herbs and remaining olive oil to make the vinaigrette.

Remove the cores from the grilled endive and radicchio. Combine the radicchio, endive, arugula, and cherries in a large work bowl. Toss with the desired amount of vinaigrette and season to taste. Garnish with crumbled goat cheese.


Wednesday, November 8, 2023

Arugula & Pear Salad with a Balsamic & Sherry Vinaigrette

 Arugula and pear Salad with a Balsamic and Sherry Vinaigrette

Last month, while at the Nugget Market in Sacramento, California, I picked up some recipe cards that caught my attention. They looked delicious, and I decided to try them all to discover new foods and salads as I continue my journey of managing diabetes through a healthy diet. Since 2022, I have managed to lose 40 pounds in a year, and my A1C is at a normal level of 5.6.  It has not been without sacrifice I am not a vegan, I still eat protein and am mindful of not being anemic.


This simple salad of peppery arugula, sweet pears, fresh goat cheese, and candied pecans gets even better with a flavorful homemade vinaigrette.

Ingredients
Vinaigrette:
1 small shallot, minced
½ teaspoon minced garlic
2 tablespoons Dijon mustard
3 tablespoons balsamic vinegar
1 tablespoon sherry vinegar
½ tablespoon honey (omit and use a substitute)
¼ teaspoon salt
¾ cup extra virgin olive oil

Salad:
1 pear
5 ounces of baby arugula
1 cup candied pecans
Vinaigrette, to taste
4 ounces chèvre
Preparation
To make the vinaigrette, combine all the ingredients except the olive oil in a work bowl and whisk. Whisk in olive oil to emulsify.

For the salad, cut a pear in half, remove the core, and slice it into thin wedges. Combine pear wedges, arugula, and pecans in a work bowl. Toss with vinaigrette to taste and arrange on serving dishes. Top with crumbled chèvre.

Extra dressing can be stored in the refrigerator for up to 7 days.


Monday, November 6, 2023

Vegan Cauliflower Roast

Thanksgiving Recipes Will Appeal To Everyone At The Table

Looking for a plant-based entree everyone will love? This flavor-packed cauliflower roast might steal the show with its savory blend of seasonings and the sweet, spicy, and umami balance of Fly by Jin Zhong Sauce. Nugget Market is my favorite.


INGREDIENTS

1 head cauliflower

1 tablespoon sesame oil

4 tablespoons vegetable oil

2 cloves garlic, chopped

2 tablespoons sesame seeds

1/2 teaspoon turmeric

1 teaspoon salt

1/2 cup Fly by Jing Zhong Sauce

PREPARATION

Preheat oven to 350

Remove the outer leaves from the cauliflower, leaving the head intact. Combine sesame oil, vegetable oil, garlic, sesame seeds, turmeric, fennel seeds, and salt to form a paste. Rub the paste evenly over the surface of the cauliflower head, pressing into all the nooks and crannies.

Place the cauliflower on a lined baking sheet and roast for 40 minutes. Baste liberally with Zhong Sauce and return to the oven to glaze for about 10 minutes, until just tender,

To serve, slice cauliflower roast into slabs or cut into florets.

Balsamic-Glazed Roasted Cauliflower


A whole roasted cauliflower makes for a fantastic vegan main dish. This one is roasted around extra veggies and has a slightly sweet balsamic glaze. It's easy to throw together and will leave you feeling full, not heavy. Win!

Vegan Sweet Potato Pie

@Kat Wirsing

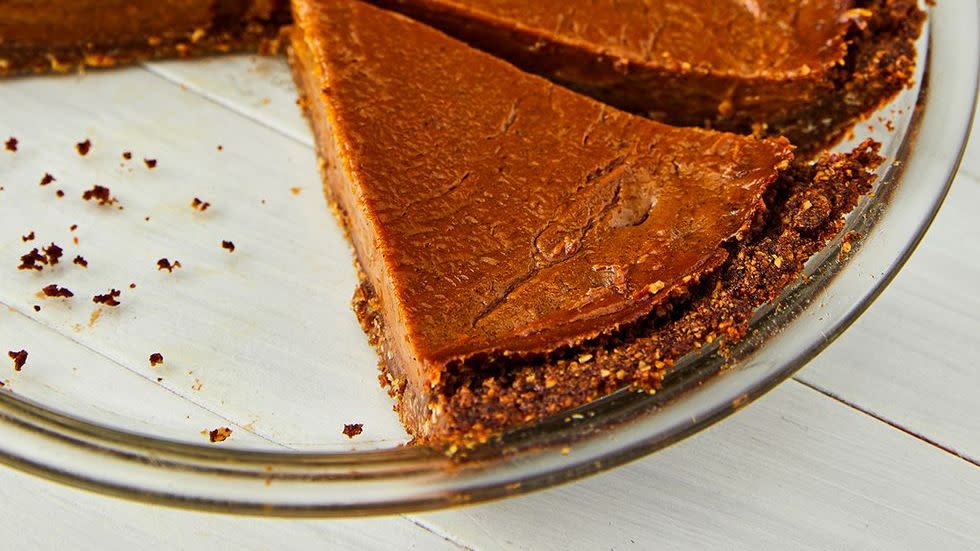
This sweet potato pie is extremely good, thanks to an oat pecan crust and a creamy, spiced filling. Look for vegan marshmallows to top it, or keep it simple with your own vegan whipped topping using coconut cream.

Ingredients

FOR THE CRUST

Cooking spray

1 1/2 c. pecans

1/2 c. old-fashioned oats

1/2 c. dark brown sugar

1/2 tsp. ground cinnamon

1/4 tsp. kosher salt

1/2 c. melted coconut oil

FOR THE FILLING

1 (15-oz.) can sweet potato purée

1 c. almond milk

3/4 c. dark brown sugar (substitute diabetics Pyure Organic Brown Sweetener ) 

2 tbsp. cornstarch

1 tsp. pure vanilla extract

1 tsp. ground cinnamon

1/2 tsp. kosher salt

1/4 tsp. nutmeg

1/4 tsp. ground ginger

FOR THE TOPPING

1 (13.5-oz.) full-fat coconut cream, refrigerated (Taste of Thai works best)

3 tbsp. powdered sugar (omit if you are diabetic)

Pinch kosher salt

Pyure Organic Brown Sweetener | Brown Sugar Substitute | Zero Carb, Zero Sugar, Zero Calorie | Measures and Bakes Like Brown Sugar | Plant-Based for Keto...

Friday, October 13, 2023

Banana Flax Pancakes

I woke up this morning craving pancakes; since I'm on this diabetic diet, I'm trying something new for breakfast. I have a couple of bags of flaxseed and flaxseed flour. I need the fiber, so I found this recipe from Kristen McCaffrey I'm trying this morning. 

 Meet Kristen McCaffrey August 21, 2023

Hi, I'm the cookbook author, recipe developer, and food enthusiast behind Slender Kitchen. I am obsessed with making healthy, easy-to-prepare, and absolutely delicious food. Meal planning is my secret weapon, and I hope to make mealtime more manageable for you with our tried and tested recipes and foolproof meal plans. These tasty Banana Flax Pancakes are nutritious, filling, and a great way to make healthier pancakes that still taste great.

▢ 1 ripe banana, mashed

▢ 2 eggs

▢ 1/4 tsp vanilla

▢ 1/16 tsp cinnamon (or nutmeg)

▢ 2 tbsp flaxseed meal

ADD TO MEAL PLAN…What is this Healthy, Low Carb, and vegetarian

Instructions

1. Mash the banana in a bowl.

2. Whisk in the eggs, vanilla, and cinnamon/nutmeg.

3. Stir in the flaxseed meal.

4. Heat a nonstick skillet over medium-high heat. Pour in batter, and once it begins to bubble and firm up on the edges, flip and cook on the other side for around 1 minute.


Sunday, July 23, 2023

African American Food Culture

 by William Frank Mitchell (Author)

The Original Innovators PHOTO: ORIANA KOREN

Like other Americans, African Americans partake of the general food offerings available in mainstream supermarket chains across the country. Food culture, however, may depend on where they live and their degree of connection to traditions passed down through generations since the time of slavery. Many African Americans celebrate a hybrid identity that incorporates African and New World foodways. The state of African American food culture today is illuminated in depth here for the first time, in the all-important context of understanding the West African origins of most African Americans of today.

Like other Americans, African Americans partake of the general food offerings available in mainstream supermarket chains across the country. Food culture, however, may depend on where they live and their degree of connection to traditions passed down through generations since the time of slavery. Many African Americans celebrate a hybrid identity that incorporates African and New World foodways. The state of African American food culture today is illuminated in depth here for the first time, in the all-important context of understanding the West African origins of most African Americans of today.

A historical overview discusses the beginnings of this hybrid food culture when Africans were forcibly removed from their homelands and brought to the United States. Chapter 2 on Major Foods and Ingredients details the particular favorites of what is considered classic African American food. In Chapter 3, Cooking, the African American family of today is shown to be like most other families with busy lives, preparing and eating quick meals during the week and more leisurely meals on the weekend. Special insight is also given to African American chefs. The Typical Meals chapter reflects a largely mainstream diet with regional and traditional options. Chapter 6, Eating Out, highlights the increasing opportunities for African Americans to dine out and the attractions of fast meals. The Special Occasions chapter discusses all the pertinent occasions for African Americans to prepare and eat symbolic dishes that reaffirm their identity and culture. Finally, the latest information on the traditional African American diet and its health effects brings readers up to date in the Diet and Health chapter. Recipes, photos, chronology, resource guide, and selected bibliography round out the narrative.

Cover Copyrighted by William Frank Mitchell (Author) 


Wednesday, July 19, 2023

Soul power by Shannon Adams-Hartung

 From the Hektoen International Journal, published by the Hektoen Institute of Medicine

SHANNON ADAMS-HARTUNG is a second-year pediatrics resident at Ann & Robert H. Lurie Children’s Hospital in Chicago. She majored in global health and history as an undergraduate student and has a clinical and research interest in bioethics. She plans to pursue a career in neonatology and palliative care. Winner of the 2022–23 Medical Student Essay Contest

Cooking fried supper for a benefit picnic supper on the grounds of St. Thomas’ Church 
near Bardstown, Kentucky. Photo by Marion Post Wolcott, August 7, 1940

Soul food has deep historical, cultural, and economic roots in the African-American community. Much of the cuisine affiliated with modern-day soul food dates back to the era of American slavery. Before the fourteenth century, the African diet was primarily vegetarian. Meat was used sparingly compared to various grains, rice, millet, nuts, and seeds.

The Middle Passage changed that. Africans were tightly packed onto ships and fed very little, leading to widespread malnutrition and death from nutrient-related ailments such as scurvy and rickets.

 Many who survived the journey to North America managed to bring tribal seeds and roots, such as watermelon seeds, yams, sweet potatoes, and okra and introduced them to the American South.

However, much of the diet of enslaved persons consisted of foods native to their new home, particularly meats and carbohydrates. Enslaved persons often fused traditional African cooking styles with these foreign American provisions. For example, millet porridge—a staple in many West African communities—was quickly transferred to Native American Chickahominy.

Cooking fried supper for a benefit picnic supper on the grounds of St. Thomas’ Church near Bardstown, Kentucky. Photo by Marion Post Wolcott, August 7, 1940. 

FSA/OWI Black & White Negatives Collection, LC-USF33-030967-M4.

Shared by 

Joseph M. Harrington, President/CEO

TheMojoGroupLTD@gmail.com


Throughout the seventeenth, eighteenth, and nineteenth centuries, food became a central element in African-American life, “a vehicle for self-expression and independence from the dominance of the plantation owners.”5 Culinary decisions were often the only ones that black people could make; thus, they became artists with the raw materials for gastronomic creativity.6 Some enslaved persons had private gardens to sell produce for monetary gain or personal nutrition. Knowledge of certain agricultural practices possessed by enslaved Africans was sought after and implemented by slaveholders: for example, growing rice.7 Strong cooking skills elevated the social status of individuals in comparison to their fellow fieldhands. These enslaved persons had the opportunity to become cooks in the main house, eating better meals while being perceived in a more positive light by the master and his family.8 Some black cooks even gained notoriety. Thomas Jefferson took his chef, James Hemmings, to France for a formal culinary education, providing him with the necessary skills to create recipes still considered influential in American cuisine.9


The significance of food, culture, and tradition during American slavery became one of the building blocks for the concept of “soul food” when it was introduced during the mid-twentieth century. As professor and historian of Southern and black history Charles Joyner said, food—and the new soul food category—became a symbolic representation of black historical lineage. In light of social pressures toward assimilation and common misconceptions alluding to the absence of a distinct African-American culture, middle-class blacks were “eager to assert their racial authenticity after World War II.”10 Dishes and recipes were therefore embraced as a part of the Black Power movement—specific pieces of African American culture tied to slave and African ancestry that could be celebrated. During the 1960s and 70s, as the Civil Rights Movement emerged, soul food restaurants and barbeques began to spring up in major cities, meant to help young people remember their past amid a struggle for a better future.11


Although many soul food traditions have obvious historical ties, some items routinely categorized under this culinary subheading have a more complex backstory. Fried chicken is one such example. Although African tribes were primarily vegetarian, chickens were often the only livestock animals enslaved persons were permitted to raise independently.12 Frying and seasoning the heftier portions of a meal, namely the meat, was also in the best interest of enslaved persons as laborers for taste and biological and physiological necessity, as fatty foods provided sustenance and endurance for long days in the field.13 Other foods, while tied to slave culture, are soul food staples resulting from modern social and financial realities. Take, for example, chitterlings or chitlins (pig intestines). As a slow-cooked meat, chitlins could be left alone all day while enslaved persons were in the field and then consumed in the evening hours.14 However, its prevalence in modern soul food is more closely tied to economic practicality. While most pig was used and sold as sausage, bacon, and ham, the intestines were often considered beneath white consumers. Historically, on the lower end of the socioeconomic scale, African Americans could not afford to be discriminatory regarding their nutrients; therefore, chitlins and other low-cost foods and drinks such as Kool-Aid became chief components of the soul food diet.


The pervasiveness of soul food in African-American households has given way to negative connotations and stereotyping in the broader community. Many of these items were dubbed “poor people’s food” in the latter twentieth century.15 Watermelons were a frequent source of ridicule throughout history, particularly in popular culture. In the late nineteenth century, Alden Fruit Vinegar trading cards displayed caricatures of blacks with “ugly, animal-like features,” stealing chickens and eating watermelon.16 This idea has persisted into the new millennium, for example, in political opposition to President Obama. In 2012, Kentucky resident Danny Hafley erected a mannequin statue of President Obama eating watermelon because the statue “might get hungry out there.”17 In 2009, Dean Grose, Mayor of Los Alamitos, California, resigned after sending an email with a picture of watermelons on the White House lawn with the caption “No Easter egg hunt this year.”18


Another critical topic is the health impact on the African-American community. Soul food tends to be meat-based and high in fat, with fewer fruits and vegetables.19 Cooking styles further exacerbate this issue, with trans-fat oils and lards used to infuse fried chicken and other meats and butter or margarine added to biscuits and pie crusts for flavor.20 But this trend has consequences. According to a study conducted in 2004, 60% of African-American men and 78% of African-American women are medically overweight. Heart disease is the leading cause of death for black Americans, and 35% of African-American adults have hypertension as the result of unhealthy lifestyles.21 While these trends are likely multifactorial, in 2009, the National Institutes of Health reported that minority soul food diets are etiologically linked to nutrition disparities and “higher incidence [of] morbidity and mortality rates,” including “poorer survival [in the black community with] many diet-related chronic diseases and conditions, including cardiovascular disease, cancer, [and] Type II diabetes.”22


Soul food is more than a dietary choice. Soul food is essential to life in many African-American families, churches, and communities. Black people have consistently used food to connect to the past and continue to eat certain dishes to honor our ancestry and narrative as people in the United States. While it has regularly been the target of negative racial stereotyping and has clear connections to poor minority health, soul food continues to unite African Americans—in history, culture, and, more literally, in preparation, consumption, and fellowship.


References

  1. Covey, Herbert, and Dwight Eisnach. What the slaves ate: recollections of African American foods and foodways from the slave narratives. Santa Barbara, CA: Greenwood Press, 2009, 211.
  2. Covey and Eisnach, What the slaves ate, 211.
  3. Counihan, Carole, and Penny Esterik. Food and culture: a reader. New York: Routledge, 1997, 272.
  4. Mitchell, William. African American food culture. Westport, CT: Greenwood Press, 2009, 7.
  5. Covey and Eisnach, What the slaves ate, 212.
  6. Mitchell, Patricia. Plantation Row slave cabin cooking: the roots of soul food. Chatham, VA: P.B. Mitchell, 1998, 14.
  7. Bower, Anne. African American foodways: explorations of history and culture. Urbana: University of Illinois Press, 2007, 47.
  8. Bower, Foodways, 51.
  9. Bower, Foodways, 51.
  10. Witt, Doris. Black Hunger: Soul Food and America. Minneapolis: University of Minnesota Press, 2004, 6.
  11. Mitchell, Food culture, 73.
  12. Bering, Jesse. “Racist Food Stereotypes and the ‘Obama Fried Chicken’ Incident.” Slate Magazine. http://slate.com/articles/health_and_science/science/2011/11/obama_fried_chicken_incident_explaining_racist_food_stereotypes.html.
  13. Covey and Eisnach, What the slaves ate, 213.
  14. Bower, Foodways, 51.
  15. Douglas, Mary. Food in the social order: studies of food and festivities in three American communities; Vol. 9. 1973. Reprint, New York: Routledge, 2003, 115-116.
  16. Lemons, J. “Black Stereotypes as Reflected in Popular Culture, 1880-1920.” American Quarterly 29, no. 1. (1977): 104. http://jstor.org/stable/2712263?seq=3.
  17. Wing, Nick. “Danny Hafley, Kentucky Man, Defends Watermelon-Eating Obama Display.” Huffington Post. December 27, 2012. http://huffingtonpost.com/2012/12/27/danny-hafley-kentucky-obama_n_2372920.html.
  18. NBC News, “Mayor to quit over Obama Watermelon email,” February 27, 2009. http://nbcnews.com/id/29423045/ns/us_news-life/#.UufTonn0Bcw.
  19. Mitchell, Food culture, 97.
  20. Mitchell, Food culture, 98.
  21. Mitchell, Food culture, 96.
  22. Satia, Jessie. “Diet-related disparities: understanding the problem and accelerating solutions.” Journal of the American Dietetic Association 109.4 (2009): 610.


SHANNON ADAMS-HARTUNG is a second-year pediatrics resident at Ann & Robert H. Lurie Children’s Hospital in Chicago. She majored in global health and history as an undergraduate student and has a clinical and research interest in bioethics. She plans to pursue a career in neonatology and palliative care.


Winner of the 2022–23 Medical Student Essay Contest

Sunday, July 16, 2023

Easy Crustless Quiche

This morning I made my first-ever crustless quiche. I've grown tired of the eggwich pop in the microwave breakfast I've had for the last eight months. I've been strict about my diabetic diet, and the results have been more than the doctor, and I could ask for. This is a quick fix to all that boredom and I can make enough to freeze for the week or two.
 
Broccoli Quiche is as versatile (and delish!) as it gets.

Easy Crustless Quiche

Here's a delicious crustless quiche recipe for those following a low-carb, high-fat (LCHF) diet. This cheesy dish is rich in flavor and texture, thanks to the Parmesan and butter that form a nice skin on the bottom. The egg and cream mixture is flexible, and you can adjust the egg-to-cream ratio and the cream's heaviness, depending on your preference. You can use any hard cheese that shreds well, such as Swiss, Cheddar, Gouda, or Provolone, and you can swap the meats for any non-watery ingredient, be it meat or vegetable. Enjoy!

Ingredients

1 tablespoon butter, melted

2 tablespoons grated Parmesan cheese

1 pound shredded Cheddar cheese

3 cups heavy whipping cream ( substitute: Evaporated Milk and Butter)

8 large eggs

1 cup half-and-half (omit evaporated milk)

Directions

Preheat Oven to 350 degrees F (175 degrees C).

Cook and stir bacon and sausage in a large skillet over medium-high heat until evenly browned and bacon is crisp, about 10 minutes; drain on a paper towel-lined plate.

Brush butter on the bottom and sides of a 9x13-inch baking dish. Sprinkle Parmesan cheese into the bottom of the baking dish and top with bacon and sausage. Spread Cheddar cheese over bacon and sausage.

Beat cream, eggs, and half-and-half together in a bowl. Slowly pour the egg mixture over the cheese and sausage into the baking dish.

Bake in the preheated oven until a knife inserted into the center of the quiche comes out clean, about 1 hour. Cool for 10 minutes before slicing.

Versatile. This recipe is for broccoli cheddar quiche but can be tailored to your tastes. Don't you like broccoli? No prob. Swap in whatever veggies and cheese you love (see variations below!), or add meat.

Easy. The homemade pie crust is the most significant part, but you can even skip that and make Crustless Quiche or Easy Quiche Recipe instead.

Works for Any Meal. Serve broccoli quiche with Baked Bacon in the Oven for brunch, alongside Arugula Salad for lunch, or with Roasted Carrot Soup for dinner. 

Great Left Over. I don't know about you, but if I take the time to cook, I want it to last for more than one meal. Broccoli quiche saves and reheats like a dream and is freezer friendly too.

Healthy. If a meal involves broccoli, you know you're getting nutrients, and the eggs pack a protein punch. Plus, no heavy cream or opulent amounts of cheese here (but don't worry, it doesn't sacrifice flavor one bit!)

Classy. Quiche makes me think of something that would be served at a lovely tea house. Prepare for pleased guests!

TIPS FOR MAKING GREAT QUICHE

The correct filling-to-egg ratio. You need to use the proper egg-to-milk ratio to make a dreamy, fluffy quiche. Too much milk and your quiche will be watery; too little, and your quiche will be dry.

Know which filling ingredients to pre-cook. A veggie that would be crunchy on its own or omit water should be roasted, sautéed, or steamed before adding to quiche. Plus, pre-cooking the veggies adds flavor. Also, you would not use raw meat, so any bacon, ham, etc., would be pre-cooked.

Less is more. I know you want to add every piece of cheese and veggie, but we need to leave room for the eggs.

Rest before serving. The quiche needs to cool before serving, or it will fall apart when you try to slice it.

How to Make Broccoli Quiche without the Crust.

Making the best broccoli quiche recipe ever is easy!

The Ingredients

DIETARY NOTE

To make quiche gluten-free, seek a recipe for gluten-free pie crust, or purchase a pre-made gluten-free crust at the store.

Broccoli. Quiche makes it possible to enjoy broccoli at breakfast or any meal.

MARKET SWAP

The beauty of quiche is its versatility. Feel free to swap in other favorite veggies. Just cook them first to soften them, omit water, and add flavor.

Green Onions. The subtle taste of onion complements the eggs and cheese. It's cooked with broccoli to soften the onions and bring out the flavor.

Eggs. The key ingredient! I use five eggs for one quiche.

Milk. I used 1% to lighten it up, but you can combine whole milk and cream for more richness.

Cheese. The best cheese for quiche is fully flavored and smooth melting. For this broccoli version, I'm using a combination of sharp Cheddar and Parmesan; Gruyere or smoked mozzarella would also be great.

Seasoning. Since eggs are pretty bland, we season them with good ol' salt and pepper and a dash of cayenne if you choose.

The Directions

Preheat the Oven to 375 degrees F. Roll your pie dough into an 11-inch circle.

Reduce oven temperature to 350 degrees F. Broccoli sautéing in a pan for healthy broccoli quiche.

Cook chopped broccoli and green onions in a large skillet over medium-high. Whisking eggs, milk, and spices for easy broccoli quiche filling.

Whisk together eggs, milk, and seasonings in a large mixing bowl.

Assembling broccoli quiche ingredients in a pie pan. Add the broccoli and cheese to the mixture of eggs, cheese, and cooked vegetables for broccoli quiche on a baking sheet.

Pour over the egg mixture. Bake broccoli quiche at 350 degrees F for 40 to 50 minutes, rest for 5 to 10 minutes, then slice and serve. ENJOY!

Quiche Variations

A culinary fashionista, quiche can try on endless flavor combos. Try out some of these variations:

Pesto Quiche

Spinach Quiche

Sweet Potato Quiche

Goat Cheese Quiche

Or play with your own! Some combos I think would be dynamite:

Mexican. Chorizo, roasted peppers, and Colby-jack cheese

Mediterranean. Feta, spinach, mushroom, and olive

Bacon + Cheddar. A classic choice. Use cooked, crumbled Air Fryer Bacon.

Ham + Gruyere. Cheese, please!

Storage Tips

To Store. To store quiche, let cool to room temperature, tightly wrap, and then keep in the fridge for up to 3 days.

To Reheat. Rewarm leftovers in a pie pan in the Oven at 350 degrees F or gently in the microwave.

To Freeze. You can freeze a quiche. Wrap the quiche tightly in plastic wrap and freeze in a freezer-safe, airtight container for up to 3 months. Let thaw overnight in the refrigerator before reheating.

STORAGE TIPS

Tightly wrap individual servings, then store in a freezer Ziplock bag to enjoy a slice of quiche on demand in the future!

MEAL PREP TIP

Prepare and blind-bake the crust the day before. You can also prep the broccoli onion filling, shred the cheese, and store it in the refrigerator. Assemble just before baking.

WHAT TO SERVE WITH BROCCOLI QUICHE

Crockpot Breakfast Potatoes

BREAKFAST & BRUNCH

Crockpot Breakfast Potatoes, easy fruit salad bowl

Overnight Lemon Blueberry French Toast. This healthy version of French toast casserole is prepped the night before, so in the morning, all you need to do is bake! Recipe at wellplated.com | @wellplated

BREAKFAST & BRUNCH

Blueberry French Toast Casserole

Recommended Tools to Make this Recipe

Pie Crust Shield. This is a handy tool to have for any quiche or pie. Made with silicone to keep pie edges from burning.

Baking Sheet. These are my go-to baking sheets!

Small Whisk. I love using a small whisk over a full-size whisk. It's easier to maneuver and perfect for smaller bowls or measuring cups.

The Best Pie Dish

This stoneware 9-inch pie plate is safe in the freezer and all the way to 500 degrees F. Perfect for any of the best quiche recipes and so many pies!

Packed with veggies, cheese, and eggs, all in a flaky crust, broccoli quiche is an all-in-one healthy breakfast you will love!

This Broccoli Quiche is a classic recipe that's healthy, versatile, and DELISH! Perfect for brunch and great leftovers for any meal.

PREP:

20minutes mins

COOK:

55minutes mins

TOTAL:

1hour hr 15minutes mins

SERVINGS: 6

Ingredients: 

1 pie crust see Whole Wheat Pie Crust or Oil Pie Crust for recipes

1 tablespoon extra-virgin olive oil

2 cups finely chopped broccoli florets, about 2 small crowns

1 small bunch green onions thinly sliced (about 1 cup)

5 large eggs

3/4 cup milk (I used 1%; use whole milk or a combo of milk and cream for more richness)

3/4 teaspoon kosher salt

1/4 teaspoon ground black pepper

1/8 teaspoon cayenne pepper, optional

2 ounces shredded extra sharp cheddar cheese, about 1/2 cup, or swap Gruyere, smoked mozzarella, or similar fully-flavored, smooth melting cheese

1 ounce finely grated parmesan cheese, about 1/4 cup, divided

Instructions

Preheat your Oven to 375 degrees F. Roll your pie dough into an 11-inch circle, then transfer it to a regular 9-inch pie dish. Build up and flute the top edges to create a rim for holding the filling. Line it with aluminum foil. Fill with pie weights or dried beans, then bake for 10 minutes. Remove the dish from the Oven, carefully lift out the beans and foil, then return the crust to the Oven and bake until lightly golden, about 3 minutes more. Reduce the oven temperature to 350 degrees F. (At this point, discard the beans or save them for future pie baking.)

Meanwhile, in a large skillet, heat the oil over medium-high. Add the chopped broccoli and cook for 4 minutes. Add the green onion and continue cooking until the broccoli is crisp-tender and the onion has softened, 1 to 2 minutes more.

Whisk the eggs, milk, salt, black pepper, and cayenne in a large mixing bowl until well combined.

Scatter the broccoli mixture on the bottom of the blind-baked crust. Sprinkle evenly with the Cheddar and half of the Parmesan. Carefully pour the egg mixture, then sprinkle the remaining Parmesan.

Carefully place the quiche on a baking sheet to catch any drips. Bake until a knife inserted 1 inch away from the edge of the crust comes out clean and the center is set for about 40 to 50 minutes. If the crust gets darker at any point than you would like, shield it with foil or a pie crust shield. Let rest for 5 to 10 minutes, then slice and serve.

TO STORE: To store quiche, let cool to room temperature, tightly wrap, and then keep in the fridge for up to 3 days.

TO REHEAT: Rewarm leftovers in a pie dish in the Oven at 350 degrees F or gently in the microwave.

TO FREEZE: You can freeze a quiche. Wrap the quiche tightly in plastic wrap and freeze in an airtight freezer-safe storage container for up to 3 months. Let thaw overnight in the refrigerator before reheating.

Monday, July 3, 2023

Taste of "Wash Your Hands First" July 1st Weekend and Sunday Morning Brunch

July 1, 2023,  starting our summer food influencer tour of Chicagoland. My granddaughter loves to eat and try different types of food, thanks to her mom introducing her to various foods and sharpening her tastebuds as an infant. There's not too much she won't try. For example, we had our Saturday late afternoon dinner hour picnic at Lake Michigan.


 She was looking forward to having KIKA Spicy Salmon, Avacado Sushi Rolls, and her KIKA Shrimp Rolls. We stopped off at the neighborhood Whole Foods Market in Hyde Park and walked to the Hype Park bridge to the shoreline, picking out a spot to enjoy the lake's view. 

Notice the rain cloud overhead. This was ten minutes before a flash flood over Chicago poured down on us and rained out our picnic. I didn't get the memo as thousands of others across the area got the emergency signal to take cover. We huddled here until a break in the rain storm and ran for the nearest bridge. 

I had promised her a picnic at the beach and purchased this fantastic picnic basket in June when I was hunting for treasures in Waldorf, Maryland. We were determined to have an outing to kick off our summer with Grandma in Chicago.


 Sunday Brunch with my granddaughter.


MENU
Fresh Fruit Mixed Berry Salad
Cheesy  Grits
Baked Lobster Tails
Butter, Garlic and Lemon Dipping sauce 
Confetti Potatoe and Egg Salad
Mixed Collard and Spinach Greens
Chocolate Cake
Cucumber, Lemon, and Mint Water

Suggested Cooking Instructions

Cut open the top of the lobster tail. Pull the meat away from the shell, leaving the meat attached at the tail end. Rinse the lobster tail and place the meat on top of the shell.

Sprinkle lobster tail mat with lemon juice, salt, pepper, and 1/2 tablespoon of butter, and keep refrigerated until ready to cook.

Melt 1/2 cup of butter, add crushed garlic, and simmer. Reserve half for basting and half for dipping.

Cook lobster tails on a grill over MEDIUM heat with the closed cover or bake in an oven at 375 degrees F. Baste frequently with garlic butter. Lobster tails are done when meat is opaque and firm to the touch for about 10-12 minutes, depending on size. Serve with lemon wedges and remaining garlic butter for dipping. 


Monday, April 17, 2023

How to Cook Artichokes | Boiling Artichokes

My granddaughter and I are having artichokes for Sunday Dinner. This is her first time learning how to prepare and eat them. We used to do this all the time in the 80s when her uncles and mother were kids.


Steamed artichokes with butter are an occasional indulgence in our home and are fun to serve when guests come over. I will share How to Cook and Eat an Artichoke in today's cooking video. Enjoy!

PREPARATION INGREDIENTS
Artichokes
Lemon

Step 1
Select a large kettle or pot to hold all the artichokes you cook. Half fill it with water and set it over high heat to boil. Meanwhile, trim the artichokes.

Step 2
Rinse the artichokes, and slice the stem off flush with the base so the artichokes will stand level. Rub the cut areas with lemon. Slice off the top inch of each artichoke and rub the cut area with lemon. Using kitchen shears, snip off the top half inch of each leaf. Place the artichokes' base side down in the boiling water, lower the heat to simmer, and weigh the tops of the artichokes with a dish or pot lid that fits into the pot to keep the artichokes submerged.

Step 3
Simmer the artichokes until the base can easily be pierced with a knife point, 20 to 40 minutes. Then, remove the artichokes from the water and turn them upside-down in a colander to drain.

If you plan to serve artichokes cold, with a vinaigrette or mayonnaise sauce, they should be removed from the refrigerator at least an hour beforehand so they are not ice hard and flavorless. For generous serving, they should be trimmed before cooking, not only of the stem so they stand upright on the plate, but the prickly tips of the leaves should also be snipped off. And by using a spoon to scoop out the fuzzy "choke" in the center of the vegetable that protects its juicy, fleshy bottom, you not only create a convenient receptacle for the sauce or stuffing, but you also eliminate the need for performing this messy bit of surgery at the table. Basic Boiled Artichokes

Dipping Sauce:
Mainly you can just use melted butter or ranch dressing.
Today I'm trying this recipe that calls for

1/4 cup Mayonnaise
1/2 tsp crushed garlic
1 1/2 Lemon juice
1 1/2 Basil
1 tsp Worcestershire Sauce. 

I boiled my artichoke with garlic, vinegar, and pure olive oil water. Drained and squeezed fresh lemon on the leaves as it sat to rest. 


She loves  devil egg and pickles 

Thursday, March 16, 2023

Peanut Boil History


Diana L. Bruton

https://nationalpeanutboard.org/peanut-info/history-boiled-peanuts-from-necessity-to-southern-delica

cy.htm

When or why Southerners started boiling peanuts no one knows exactly. But good ideas have a way of spreading and, today, Southerners know how great boiled peanuts are. Not only are boiled peanuts called “the caviar of the South,” but they are also the official state snack of South Carolina. From Labor Day on into the holiday season, boiled peanuts are abundantly available at roadside stands, gas stations, ball games, festivals, and anywhere else people gather for fun.

History gives us clues about the origin and growth of the popularity of boiled peanuts.

Colonial Days:

Peanuts were first brought to America by slaves from Africa and the practice of boiling peanuts probably originated here. If there was a surplus peanut crop, field workers would hold a “peanut boil” to celebrate with shared conversation and food. 


Tuesday, February 7, 2023

Breakfast Brunch Ideas Breaking the Fast Flavorfully

Looking for a quick and flavorful breakfast or brunch?

Avocado Toast Garnished with Deviled Eggs

 Learn how to make avocado toast by choosing from six flavorful recipes to get you started. Once you’ve mastered the basics, you can get creative using more of your favorite toppings.

Avocados are versatile fruit to slice, mash, or fill. The creamy and buttery texture makes any meal better. There are plenty of health benefits to match their luxurious taste, notably their healthy mono and polyunsaturated fat content and antioxidants like beta carotene. Avocado is the star of this popular and trendy dish that still has people obsessing over it.

Mastering this simple avocado toast recipe will make breakfast or brunch more exciting. Learn the basics for preparing the base and nailing the perfect golden brown toast. Start with an essential combination, or get adventurous with six different recipe ideas I created for you. Whether you’re craving Italian flare or a classic bacon and egg combination, I’ve got plenty of options.

How to make avocado toast?
There are only two must-have components; toasted bread and sliced or mashed avocados. From here, you can keep it simple with seasonings or get more creative with various topping ideas. A large, eight-ounce avocado is enough to make two generous servings. It yields about ½ cup of mashed fruit.

Ingredients 
Simple Avocado Toast
▢2 slices bread, sourdough, wheat, Italian or French loaf, ½"thick pieces
▢1 large avocado
▢¼ teaspoon lemon juice
▢¼ teaspoon kosher salt
▢⅛ teaspoon black pepper
▢1 teaspoon extra-virgin olive oil
▢1 teaspoon chopped parsley, optional


We thought brunch couldn’t get any better or more delicious, then we met pancake bites. Game changer. You might think, “why not just make one big pancake?” Well, everything is better in bites! With this recipe, you can go as crazy as you want with toppings or just stick with a classic plain pancake. If you have picky eaters around, they can build their own. This recipe makes 36 bites, so there is plenty of room for experimenting. (Omit sugar, maple syrup, and chocolate chips if you are on a diabetic diet)

Ingredients
1 cup flour
2 tablespoons sugar
1 tablespoon baking powder
1/2 teaspoon salt
4 tablespoons of PB2 Peanut Protein Powder
1 cup non-dairy milk (you can use regular milk if you prefer, it will just make these non-Vegan)
1 tablespoon apple cider vinegar
Dash of vanilla
Maple syrup for the dipping topping of your choice, but we suggest chocolate chips and berries

Instructions
1. Preheat oven to 350 degrees. Grease a mini muffin pan. If you want to save time, grease up 2. This recipe will make 36 mini muffins.

2. Whisk together flour, sugar, baking powder, salt, PB2, milk, apple cider vinegar, and vanilla in a large bowl.

3. Fill the pan with batter and stud with toppings of your choice.

4. Bake the pancake bites for 8-10 minutes. Allow cooling for 10 minutes.

5. Serve with a side of maple syrup, and enjoy!


Equipment
Mixing Bowls
Whisk
Cast Iron Pan
Fish Spatula


Ingredients
½ cup flour
¼ cup yellow cornmeal
15 ounces of canned salmon
1 red bell pepper, finely chopped
½ cup sweet onion, diced
1 large egg, beaten
1 teaspoon Worcestershire sauce
½ teaspoon seasoned salt
¼ teaspoon pepper
½ teaspoon garlic powder
¼ cup mayonnaise
¼ cup cilantro, chopped

Olive oil for frying
Instructions
In a large bowl, whisk together flour and cornmeal.
Add salmon, bell peppers, sweet onion, seasonings, Worcestershire sauce, mayonnaise, cilantro, and egg. Mix until well combined.
Shape into about 6-8 patties. Heat oil in a large skillet over medium-high heat.
Once the skillet is hot, cook the patties on each side for 2-3 minutes or until they are golden brown.
Serve immediately with your favorite dipping sauce.

If you've tried this recipe, come back and tell us how it was in the comments or star ratings!

What is Salmon Croquettes?

Some might even refer to them as salmon cakes or a salmon patty, like a crab cake, but with salmon! A salmon burger, but without the bun.

Like crab cakes, seasoning is everything for Salmon Croquettes. This recipe uses a blend of garlic, cilantro (my secret ingredient!), seasoned salt, Worcestershire sauce, and then pan-fried for a nice brown crisp.

Salmon patties are also great with your favorite dipping sauce. There are many homemade sauce options available, but here are some of my favorites:

Use this Sriracha Sour Cream Sauce for zest and tang.

Homemade Tartar Sauce is another option for this beautiful salmon creation.

Add fresh lemon juice with wedges or slices.

If you have kids, ketchup is a viable option as a dip for these Salmon Croquettes.


NOTES:

About The Author:

JESSICA FORMICOLA

Jessica is the mom, wife, and food lover behind Savory Experiments. She is obsessed with butter, salt, and bacon and spends all her time in the kitchen and behind a camera. Jessica contributes to Pop Kitchen by Parade, Better Homes & Gardens, The Daily Meal Food + Travel, and more.

Jessica Gavin

A little background, I grew up in the bustling cities of the San Francisco Bay Area. Northern California is a melting pot of various cultures and cuisines, and my curiosity and appreciation for food were embraced.

My fondest memories were weekend visits to Oakland Chinatown with the family to shop for fresh vegetables, roasted meats, and special pink bakery boxes loaded with Chinese sweets. From a very young age, I noticed how food could bring people together and create bonds – I knew that food would have a very important role in my life.

Education, My passion led me to study Food Science for my bachelor’s and master’s degrees in college at Cal Poly San Luis Obispo, California. During my studies, I learned about food technology and how food is delivered from “farm to fork,” focusing on providing safe and wholesome food and understanding the consumer.

Saturday, February 4, 2023

BAYOU JAMBALAYA

 https://pioneerbrand.com/our-heritage/


I was looking for an excellent stew to take the chill off this cold Chicago weekend.  I pulled this seasoning mix packet out of the bend, which had been there for months. I decided to try it tonight. It was so GOOD!  I have to tell everyone to try it. Mind you this isn't a commercial or a paid advertisement, I just found a brand that I'm willing to try again and again, especially for a quick hot meal.  I omitted the rice.  Since I'm on this diabetic diet.

A kickin’ culinary staple now straight from your kitchen! This easy-to-prepare jambalaya is even easier to devour with hearty ingredients and delicious Creole flavors. Yields 5 serving

BAYOU JAMBALAYA

Prep Time: 10 minutes

Cook Time: 15 minutes

1 pkg. Pioneer Bayou Jambalaya Meal Seasoning Mix

2 ¼ cups water

1 cup parboiled long-grain rice

1 lb. meat of choice – smoked sausage, cooked chicken, or shrimp*

Optional: ½ cup chopped green bell pepper, ½ cup yellow onion, and 1 (14.5 oz.) can dice tomatoes**

Mix seasoning mix with water in a 3-quart saucepan, and bring to a boil.

Add rice meat of choice.

Simmer covered for about 20 minutes until rice is tender.

Remove from heat, and let stand for 5 minutes.

Fluff with a fork before serving.

*Add cooked shrimp during the last 5 minutes of cooking time.

**Saute peppers and onions in 1 tbsp oil. Proceed to Step 1, and add the diced tomatoes before boiling them.

NOTES: 

TSHA | Guenther, Carl Hilmar (tshaonline.org)

GUENTHER, CARL HILMAR (1826–1902).Carl Hilmar (Hilmer) Guenther, pioneer miller, son of Carl Gottfried and Johanne Rosina (Koerner) Guenther, was born at Weissenfels on the Saale River in Germany on March 19, 1826. He was one of eight children, the first of this line to migrate to America. In 1848 he traveled to New York and then to Wisconsin and down the Mississippi River before returning to Germany for a few months. Around 1851 he returned to America, landed in New Orleans, and traveled to Indianola, Texas. From Indianola he trudged the 250 miles to San Antonio beside a provision wagon. In San Antonio he heard of the need for a gristmill and flour mill in Fredericksburg, so he traveled there and built his first mill on Live Oak Creek nine miles west of Fredericksburg. He excavated the mill race with a pick and shovel and designed and made the waterwheel and gears of native woods. After a flash flood swept away an incomplete dam, he rebuilt from the ground up. In 1855 he married Dorothea (Dorathea or Dorethea) Wilhelmine Henriette Pape in a Lutheran ceremony in the first community church. They had seven children. Guenther was Fredericksburg justice of the peace in 1856. After two years of drought had depleted the crops and water supply, the family moved to San Antonio in 1859. By October of that year, on the bank of the San Antonio River at the foot of King William Street, Guenther had built the first flour mill in the city. In 1898 his mills were incorporated as C. H. Guenther and Son; the name was later changed to Pioneer Flour Mills. Guenther also established a small ice plant called the Southern Ice Company (later Southern-Henke Ice Company). He helped found San Antonio's German-English School and held membership in the Beethoven Männerchor, the Arbeiter Verein, and the Casino Club, San Antonio's first social club and theater. Guenther and his descendants constantly improved and enlarged the mills. By 1900 their 200-horsepower engine was the largest in the city. Guenther died on October 18, 1902, in San Antonio and was buried beside his wife in City Cemetery No. 1

Tuesday, January 31, 2023

Crispy Baked Tofu

 
@ KARIN SCHWAB Photo Credit

Let’s talk about tofu! Even as a vegetarian, I don’t eat a ton of it. When I do, however, I want it crispy, and crispy tofu is an elusive beast. I’ve shared this method here and here, but I’ve gotten such fantastic feedback that I wanted to highlight it.

Even tofu skeptics love this tofu. Try it, and you will see it!

INGREDIENTS
1 block (12 to 15 ounces) of organic extra-firm tofu
1 tablespoon extra-virgin olive oil
1 tablespoon tamari* or soy sauce
1 tablespoon cornstarch or arrowroot starch
Tips for Irresistibly Crispy Tofu

1) Choose the right kind of tofu.

Extra-firm tofu is the only way to go, and I’ve found that the Trader Joe’s brand is the most firm of them all (plus, it’s only two dollars). It’s also organic, essential when buying tofu because soy is conventionally treated with fertilizers, herbicides, and insecticides. Look for tofu in the refrigerated section by the produce.

2) Squeeze out as much moisture as possible.

Water-logged tofu always gets somewhat crispy. The key here is to slice the tofu into pieces before pressing it. Have you ever tried pressing a whole block or even two halves? They just sit in soggy puddles. Instead, slice them into smaller pieces to maximize the surface area. Press those, and you’ll extract more moisture—faster, too.

3) Toss your tofu in oil, soy sauce, and starch.

Now, you just need to toss your tofu in a bit of oil (just 1 tablespoon for the whole batch), tamari or soy sauce (for some flavor), and cornstarch or arrowroot starch. The starch makes the edges extra crispy and irresistible (I got this idea from The Kitchen).

Cornstarch vs. arrowroot: You might be wondering which starch is better. Cornstarch is a more processed ingredient, but it yields the crispiest results. Arrowroot is less processed and works well, but the outer covering can become slippery and strange if you add tofu to a dish containing a lot of moisture (like curry).

4) Bake it.

Spread your prepared tofu in an even layer across a sheet pan. Don’t worry if your tofu fell apart as you tossed it. Bake until golden brown, about 25 to 30 minutes. Boom! Perfect tofu.

Why Bake Your Tofu?
Some swear by cooking their tofu in a skillet, but it never turns out well in my cast iron skillets. It sticks, and the crispy bits end up sticking to the pan, a tofu tragedy. Plus, it requires more oil, and you don’t need much oil to get crispy tofu.
When you bake your tofu, you give it time to develop crispy edges and warm, pillowy insides. It’s simply the best.

@ KARIN SCHWAB Photo Credit

@ KARIN SCHWAB Photo Credit

Uses for Crispy Baked Tofu
If you want to infuse your tofu with more flavor, I recommend adding sauce after it’s baked rather than marinating it. Why? Water-logged tofu isn’t very good at absorbing flavor (something I always suspected, which was confirmed by Deborah Madison via Serious Eats).

So, bake your tofu in the oven to crispy perfection, then cook it in sauce, or drizzle sauce on top. This tofu is perfect for tossing into any recipe with Asian flavors or any recipe that could benefit from some hearty vegetarian protein. For example, it would be great in my Thai red curry or green curry.

You could replace the eggs in my kale, coconut fried rice, and Thai pineapple fried rice with this tofu. It is fantastic, with peanut sauce drizzled on top in any form. (Fun fact: my crispy tofu and peanut sauce collide in my cookbook!)

INSTRUCTION

Preheat the oven to 400 degrees Fahrenheit and line a large, rimmed baking sheet with parchment paper to prevent the tofu from sticking.

To prepare the tofu: Drain the tofu and use your palms to gently squeeze out some of the water. Slice the tofu into thirds lengthwise, so you have 3 even slabs. Stack the slabs on top of each other and slice through them lengthwise to make 3 even columns, then cut across to make 5 even rows (see photos).

@ KARIN SCHWAB Photo Credit

Line a cutting board with a lint-free tea towel or paper towel, then arrange the tofu in an even layer on the towel(s). Next, fold the towel(s) over the cubed tofu, then place something heavy (like another cutting board topped with a cast iron pan or large cans of tomatoes) to help the tofu drain. 

Let the tofu rest for at least 10 minutes (preferably more like 30 minutes if you have the time).

Transfer the pressed tofu to a medium mixing bowl and drizzle with the olive oil and tamari. Toss to combine. Sprinkle the starch over the tofu, and toss the tofu until the starch is evenly coated, so no powdery spots remain.

Tip the tofu bowl onto your prepared baking sheet and arrange the tofu in an even layer. Bake for 25 to 30 minutes, tossing the tofu halfway until the tofu is deeply golden on the edges. Use as desired.

NOTES: 

This blog post is all about celebrating good food—natural, sustainable food that delights the senses and nourishes the body.

 Kathryne is a self-taught photographer and cooks from Oklahoma. She started this blog in 2010 and named it after her canine sidekick, Cookie.

Thai Red Curry with Vegetables

Homemade Thai red curry recipe with vegetables! So much better than takeout.  You know dinner is good when you want to eat it for breakfast. Speaking of, it’s 10 am, and I’m writing with a happy belly. This Thai red curry made a fantastic meal last night and an even better breakfast this morning. It’s warm, comforting, and perfect for cool days. It’s a little rich, too, but so full of vegetables that it doesn’t feel too indulgent.

Thai red curry ingredients

I’ve been meaning to try a red Thai curry based on my green curry for a while now, and I’m so glad I finally did. It’s the best curry I’ve ever had, restaurant versions included! Yeah, I said it.

Bonus? You should be able to find everything you need for this simple curry at a well-stocked grocery store.

Thai Red Curry, Tips. The secret to making excellent Thai curries is to use plenty of aromatics, like onion, ginger, and garlic. Choose full-fat coconut milk for its richness (you won’t regret it!). Stirring in just a little bit of rice vinegar and sugar adds complexity.

Readily available store-bought Thai red curry paste adds characteristic Thai flavor; bonus, the Thai Kitchen brand is vegetarian. You can make your own if you’re so inclined, though. Feel free to change up the vegetables, as long as you slice them, so they’re all pretty small and about the same size. You could try broccoli, cauliflower, mushrooms, diced butternut, or sweet potato (which will probably require a longer cooking time), sliced zucchini, and/or yellow squash.